
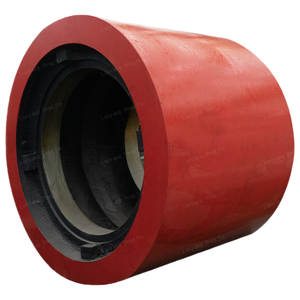
Welding a fractured excavator track pad represents a critical repair procedure to recover capability and prevent devastating failing during operation. Track pads, commonly fabricated from high-strength, abrasion-resistant steel (commonly AR400 or comparable qualities), endure immense effect, bending, and shear pressures. Cracks typically initiate at tension concentrators like screw holes, edges, or put on lips. Successful repair demands thorough adherence to procedures thinking about the product’s homes and the pad’s structural function. This guide details a professional method.
(how to weld a cracked excavator track pad)
Critical Pre-Welding Considerations: .
1. Safety and security Paramount: Separate the equipment. Secure the boom/stick, obstruct the tracks, and involve all safety and security locks. Make use of ideal Individual Protective Tools (PPE): welding headgear with appropriate shade, flame-resistant clothing, handwear covers, shatterproof glass, and hearing defense. Make sure adequate air flow for fume extraction.
2. Thorough Evaluation: Tidy the pad meticulously, removing all mud, grease, oil, and corrosion using cord brushes, grinders, or degreasers. Failure to achieve absolute sanitation guarantees bonded problems. Carefully evaluate the fracture. Establish its complete length, deepness, and course. Identify the source when possible (e.g., impact damages, fatigue). Most importantly, evaluate the pad’s total condition. Serious wear, thinning, several cracks, or compromised bolt openings frequently necessitate pad replacement instead of repair work. Welding extensively thinned or severely fatigued steel is inefficient and harmful.
3. Material Recognition: Confirm the pad product quality if possible (e.g., using markings or paperwork). AR400 and similar steels are high-carbon, low-alloy steels vulnerable to solidifying and splitting in the Heat-Affected Area (HAZ) if welded incorrectly. This dictates specific procedures.
Repair Methodology: .
1. Break Preparation (Grooving): .
Quit Exploration: Drill a little opening (approx. 6-8mm diameter) at each noticeable end of the split. This is important to stop further breeding during welding.
Groove the Fracture: Making use of a grinder with a thin cutting or grinding disk, meticulously open up the whole size of the crack right into a V-groove or U-groove. Erode to appear metal, ensuring complete removal of the crack. A minimum groove angle of 60 levels is recommended for ample penetration and access. The groove must be definitely tidy and devoid of oxides or contaminants. Magnetic Fragment Assessment (MPI) or dye penetrant post-grinding can verify fracture elimination if viable.
2. Preheating: This is non-negotiable for high-strength steels. Pre-heating reduces the cooling price, reducing HAZ firmness and the danger of hydrogen-induced splitting (chilly splitting). Preheat the area bordering the groove evenly to 150-200 ° C( 300-400 ° F). Usage temperature-indicating sticks or an infrared thermometer to keep track of. Keep interpass temperature level within this variety. 3. Welding Refine & Consumable
Choice: . Process: Protected Metal Arc Welding (SMAW- Stick welding) is most practical for field repair work because of its portability and tolerance to less-than-ideal conditions. Gas Metal Arc Welding( GMAW- MIG) with solid wire or Flux-Cored Arc Welding (FCAW) can be used if proper gas shielding is attainable, but SMAW is commonly liked for root passes in constricted areas. Electrode: Make use of a low-hydrogen electrode( AWS classification E7018 or matching). E7018 gives great stamina, ductility, and crack resistance. Make sure electrodes are fresh, correctly stored in a heated closet( 110-150 ° C/ 225-300 ° F), and used within their defined time out of the stove( usually 4 hours). Electrode diameter ought to be appropriate for the groove dimension( e.g., 3.2 mm or 4.0 mm). 4. Welding Technique: . Employ brief stringer grains. Avoid extreme weaving, which boosts heat input and distortion. Deposit the root pass very carefully to ensure complete infiltration at the bottom of the groove
. Eliminate slag thoroughly in between each pass using a breaking hammer and cord brush. Build up subsequent passes, making sure great combination with the sidewalls and previous grains. Stagger start/stops. Take care of warmth input very carefully. Allow quick air conditioning durations if necessary to remain within the interpass
temperature range. Do not go beyond about 250 ° C( 480 ° F). Fill up the groove totally, a little overfilling to enable dressing.
5. Post-Weld Treatment: . Managed Cooling: After the final pass, cover the weld location right away with an insulating covering( e.g., fiberglass) to assist in really slow cooling. This more lowers residual stress and anxieties and HAZ solidity. Permit the pad to cool to ambient temperature level gradually (a number of hours ). Anxiety Relief (Optional yet Beneficial): If workshop centers are readily available, post-weld warmth treatment( PWHT) around 600 ° C (1112 ° F) complied with by regulated cooling substantially boosts sturdiness and decreases residual stresses. Nevertheless, this is usually not practical for area repair work. Weld Dressing: As soon as cool, grind the weld grain flush with the bordering pad surface. Ensure a smooth shift to prevent developing brand-new stress and anxiety risers. Pay certain interest to the weld toe. 6. Post-Repair Examination: Aesthetically evaluate the weld for surface area issues( cracks, porosity, undercut). Non-Destructive Screening( NDT), such as MPI or Ultrasonic Testing( UT), is very suggested to validate interior strength, particularly for essential or large repair work. Examine pad alignment and track stress. Important Cautions: . This repair service restores architectural integrity but does not replace lost wear material. The repaired location might put on in different ways. Welding alters the metallurgy in your area.
The HAZ is inherently a prospective weak point. This procedure addresses local cracks. Pads with extensive damage or serious base metal deterioration ought to be changed. Display the fixed pad closely during preliminary operation for any type of signs of split reappearance. By carefully following these steps– stressing cleanliness, right preheat, low-hydrogen consumables, regulated strategy, and slow air conditioning– a sturdy and secure weld repair on an excavator
(how to weld a cracked excavator track pad)
track pad can be achieved, lessening expensive downtime while making sure driver safety.